|
| The vertical stab is aligned and glued to the fuselage. Next add balsa fillets
on each side of the vertical stab. Tack glue, shape, remove, hollow and then glue in place
on each side of fin. |
 |
| Bottom view of the lower fuselage sanded to shape. The lower rear fuselage is made of solid balsa blocks
carved and shaped with temporarily tacked to lower fuselage. After shaping remove, hollow out for weight saving and then
permanently glue in place. |
 |
| Glue a 1/4" balsa scrap on the lower part of the "rudder" and blend to taper
of fuselage tail. |
 |
| "Adjust" the slots in the fuselage so that the horizontal stab will be absolutely
level with the wing saddle. Use a small level across the top of the fuselage in the
top hatch area. Be sure the incidence is 0° leading edge to trailing edge. |
 |
| The wing is glued to the fuselage. The top hatch/canopy is constructed from
1/16" balsa. A 1/8" dowel in the front of the assembly and a 4-40 screw at the back will
hold the hatch in place. An "Aeroplastic" canopy will cover the cockpit area. We are
now ready to add the large wing fillets that distinctive on the Mig-3. |
 |
| Mark the outline of the proposed wing fillet on the fuselage side and top of the
wing. Make wing fillet formers from 1/16" balsa and glue to the top of the wing and fuselage side.
Use a heavy "construction paper" template to test the fit of a fillet covering sheet that
will cut from 1/32" balsa. |
 |
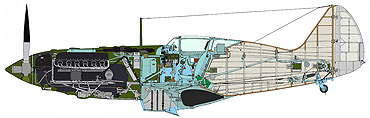
The lower underwing scoop is framed with 1/16" balsa. Sheet the frame and then cut, carve and
sand a block of balsa for the aft end of the scoop to blend into lower rear fuselage as shown by the pencil
line. |
 |
The side scoop/radiators are another distinct feature of the Mig3. They are made by creating
a 1/6" balsa base strip, adding then adding three small formers. Wrap a wet 1/32" balsa sheet over the formers
and secure with thin Ca glue. Slice the front end of the half round scoop at an angle to create the oval opening shape.
Glue these to the fuselage side prior to priming and painting or after covering. |